Sunday, December 15, 2013

The last craft show!


My last craft show went well. I didn't sell nearly as much as I was hoping for, but I did well, considering the low turnout. It was snowing during the whole show, and I think people were just not willing to venture out. Oh, well! I still had a lot of fun :). My craft show neighbors were all so fun to talk to, and a friend brought me lunch and hung out with me for a while (thanks, Brooke!)

 One of my craft show neighbors, Cara (the one on the right), of 23 Bins, makes and sells these wonderful recycled wool tunics, and tops. She is so fun and cool!

She doesn't sell them online, but if you are local, and want to contact her about her next show/shows, you can email her. I don't want to post her email here, so she doesn't get spam, but contact me if you want her email.

Wednesday, December 11, 2013

My son's cowl

 I finally am willing to admit that winter is here, and dug out the rest of our winter accessories. I pulled out the neck cowl I made for my son when he was 4 (now 8), and he exclaimed "I love that thing! Thank you so much for making that for me, Mama!", and immediately put it on. It doesn't get much better than that! :)

He won't model for me anymore, so these pics of it will have to do ;)! The outside is pieced together from lambswool scraps, and the inside is lined with cashmere.

Tuesday, December 3, 2013

It's Tutorial Tuesday! Make a recycled wool dog bed!


This project takes under an hour to make, from start to finish, and your pet will thank you! Why wool for a pet bed? Wool is insulated, so it keeps your pet warm n' cozy when it's cold, and cooler when it's warm. Wool is naturally hypoallergenic and has antibacterial properties, so unlike other materials that absorb dirt and odors, wool resists them! These will not fall apart when you wash them, like the cheap ones in the pet stores, and because they don't hold odors, you won't need to wash them nearly as often. Another great reason... pets love wool! If you lay a wool blanket and a cotton blanket side by side, my dog will always choose the wool! Convinced, and ready for the tutorial?

I had a couple of sweaters that just wouldn't felt (shrink up), even though they said "dry clean only" and are 100% wool. It happens. Sometimes I come across "superwash" and "washable wool" sweaters too. These won't felt. Since I can't use them for felt projects, I decided to come up with a way to use them in their whole form... pet beds!

First, take 2 non-felting wool sweaters (you can use sweaters that may felt, but you will have to take care when washing your pet bed, so it doesn't shrink up on you! I have learned that if I use my "wool cycle" on my washing machine, my projects will not felt any further). Fold them into a rectangle shape, with the arms on the inside, smoothing them out as best as you can, so your bed is flat.


Now that you have your 2 sweaters arranged in a bed-ish shape, baste stitch (big stitches sewn by hand) all around, so that the sleeves don't move around and make the bed lumpy. I know... it's not pretty ;). Don't worry, you'll be making the cover next!


 Now you will want to make a cover for bed. Cut a pattern out of paper that is a rectangle, slightly bigger than your bed insert, about 1/2" bigger all around.


For the cover, I used part of a felted wool blanket. If your pet bed is small enough, and your sweater is big enough, you might be able to use the front and back panels of a felted sweater instead. Now cut out your cover, using your pattern piece. If you are using a blanket, like I did, you can just cut it twice the width, and fold over the one side, so you have one less seam to make. Once your pieces (or piece) is cut out, sew all sides, except for one.


Now place your bed inside the cover. Once it is inside you can sew a quick baste stitch from the bed to the cover,  in each corner, to prevent the bed from moving around inside the cover.


 Now just sew up the last side! I hand sewed it, so I could tuck the edges in and make a seam. My machine wouldn't have been able to handle that many layers.

I promise it's not as wonky as it looks in this picture ;). I have no idea why it doesn't look rectangular, but it is! Maybe because the pattern wasn't symmetrical once the blanket was felted.


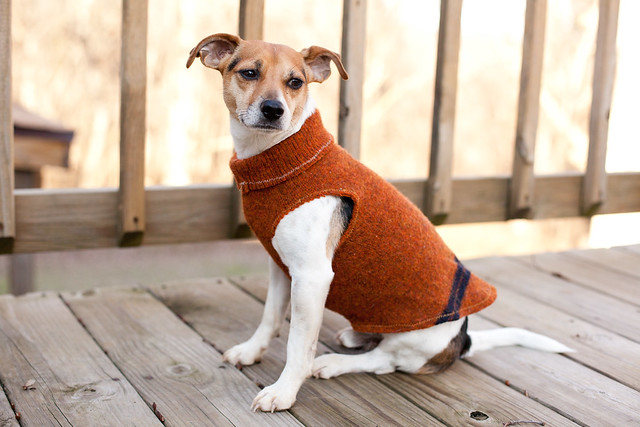
Now it was time to test it out on Spots! She inspected it thoroughly...


... and she approved (that blur at the top of the picture is a happy tail!)!


If you don't have any non felting wool, and want to make this project, I will send 2 non-felting sweaters for free to anyone that buys a wool blanket from my shop! Just let me know in checkout that you want the sweaters.


Monday, December 2, 2013

Sweater Monday is postponed this week :(

Due to technical difficulties (my clumsy, tired self spilling coffee on my laptop this morning), Sweater Monday will be postponed this week :(.  I have a second laptop, but it has no photo program, so I don't have my sweater pictures to upload at the moment. One way or another, i'll be up & running again in the next day or 2, and will send out the Sweater Monday reminder email to those on the list when I post this weeks sweaters. Thank you for patience & understanding in my time of stupidity and carelessness :).

Saturday, November 30, 2013

Are you local? Come see me at my last craft show!


I gave up doing craft shows a couple of years ago, because I just don't have the time anymore between working outside the home, running Resweater, and being a mom, but I still have so much inventory left, so I thought i'd give it one more show! My prices will be really low, so come on by! I'll have my dryer balls (of course!)...


mittens...


 pillows...


 hats...


 dog collar bows...


 ... and so much more!

Where, what, when, you ask? I'll be at the Rejoice Lutheran Church Christmas Market, 0N377 N Mill Creek Dr (Mill Creek Subdivision) in Geneva, IL 60134, on December 14th from 9am-2pm. I hope to see you there!

Tuesday, November 19, 2013

It's Tutorial Tuesday! Make a easy fun recycled wool scarf!


Winter and Christmas is upon us, so it's time for a fun new winter accessory and gift idea! These are easy to make, and make a great Christmas gift for teachers, crossing guards, moms, sisters... you name it, or just make one for yourself!

First, you start with your pattern, a square. That's it. I used a 5" square, but you can make them as big or small as you want, depending on how wide you want your scarf to be. When picking out your sweaters for this project, I suggest lightly felting (felted enough, so that the edges don't unravel when you cut, but still pliable and stretchy), so the scarf is not stiff. I used a lambswool angora blend. They felt up nicely, staying soft and pliable, without getting stiff.  Cashmere would be great as well!


Now that you have your pattern, just cut out a whole mess o' squares.


Start pinning them together, and you will see how many you need, based on how long you want your scarf to be. The closer together they are, the thicker the middle gets. You can place them at whatever distance apart looks good to you.


Now just sew a straight line through the center, and you are done! See... I told you it was easy!

Now you just have to decide how you want to wear it!


Tuesday, November 5, 2013

Tuesday, October 29, 2013

It's Tutorial Tuesday! Make a recycled wool bow in under 5 minutes!


 photo d2f73c70-adbb-4019-80d0-2b5e62daabe0_zps83846f84.jpg


This is such a versatile and easy project. These take me under 5 minutes to make, but look so nice! Ready to learn how to make these yourself? First you cut your pieces of felted wool. You can tweak this to get different sizes, but for this tutorial I used 7" x 2 1/2" for the main piece, and 1 1/2" x 1/2" for the small piece.


Once you have your pieces cut, take the main piece and fold it in half. Sew the 2 ends together. It doesn't matter what the stitching looks like, because you won't be able to see it when your bow is complete.


Leave the needle/thread attached, and move the sewn seam to the center.


 Now fold the width of the bow in half, so the seam is facing you, and the ends are facing away.


 Now, while keeping the center pinched, fold the sides back toward the seam. The middle should resemble a W.


Now, while keeping that "W" pinched in the middle, wrap the small strip tightly around the center and sew into place.


 Now flip it over and voila! You have a bow!


 From here there are endless things you can do with your bow. Sew a hair rubberband to the back for a hair bow...


 Sew a loop of elastic to the back and slide it onto your dog's collar. I apologize for the bad pictures... Spots was not being a cooperative model ;) ...


 and of course you can use this as a classy bow tie too! Just sew a small strip of wool, or fabric, to the back, to go around the neck, with a little velcro at each end. My child model declined this photo op, so this picture will have to do, but it's much cuter on an actual boy ;)...


You can use these bows to embelish purses, presents, barrettes... you name it! Watch out though. Once you start making them, you cant stop!

 I never mind anyone blogging, tweeting, Facebooking, Pinning, etc. any of my tutorials, but please always link back to my blog, instead of cutting/pasting the tutorial to somewhere else. Thanks, and enjoy! :)

Saturday, October 26, 2013

Before and after!

I always love to see what everyone makes from the sweaters, but this was too cute not to share! Lisa made this ADORABLE sock monkey costume for her grandson. Thanks for sharing with us Lisa!

Before...
 

and after...


Margaret of Fox Island Fancywork, makes a lot of fabulous things from Resweater sweaters. Here is one before and after:

1437 Big cashmere argyle black red sweater for upcycling

Infinity Cashmere Wool Scarf made from an upcycled black and red argyle sweater

Though I couldn't find the "before" sweaters on these, she has made all these wonderful things from Resweater sweaters, and I am always amazed at what she can do to a sweater! If you need any warm weather accessories or unique gifts, her shop is the place to go!

DSCF4791.JPG DSCN4821.JPG

100_1239.JPG DSCF1474.JPG